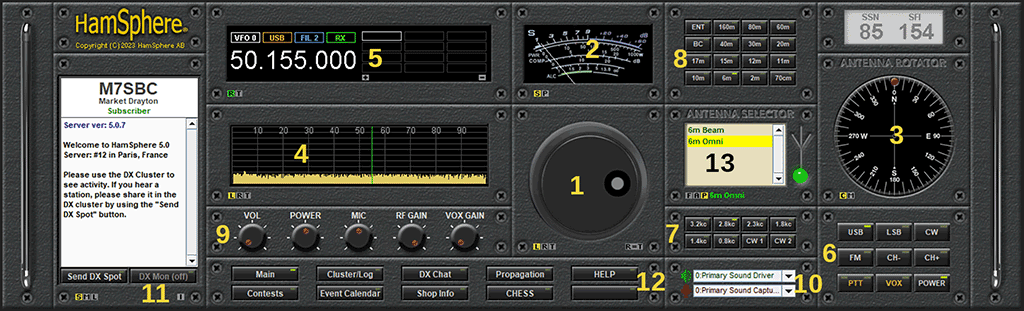
Engage with the VFO dial to move across the band. Utilize the L = lock function to synchronize the TX and RX frequencies. The R = RX frequency and T = TX frequency buttons offer individual frequency adjustments. For split operations, take note of the yellow R=T indicator; clicking it will synchronize TX and RX frequencies.
The S highlighted in yellow provides a visual on received signals. Adjust your mic volume to correctly set your ALC level when transmitting. When the P is highlighted in yellow, it showcases your transmission power during PTT activation.
Engaging with this plugin is intuitive. The distinctive red dot transitions to green when a rotatable Antenna, like the 6-meter beam, is in use. Adjust the azimuth accordingly. The display options, C and M, provide control over the great circle map's presentation on the rotator.
The Band Scope plugin visualizes signals on your current band. When the L is highlighted in yellow, it permits frequency adjustments via left-clicks across the center. The R and T buttons, highlighted in their respective colors, enable distinct adjustments for receive and transmit frequencies. A deeper exploration of split mode functions will be provided in a subsequent guide.
The LCD indicates the current frequency for any chosen band. It features 12 storage boxes on its right side for user-defined frequencies. Utilize the small + at the bottom to save a frequency, or the - at the bottom right to remove one. The color-coded R and T provide clarity on receive and transmit frequencies, especially vital for split mode operations.
The Button Panel is equipped with illumination features; green for the USB button on bands 6-30m and for the LSB button on bands 40-160m. The CW button, when activated, reduces power. There are additional utilities such as frequency stepping, a Voice Operated Switch (VOX), and Push To Talk (PTT) functions. The POWER button conveniently transitions you back to the HamSphere 5.0 startup screen.
The Filter Panel enhances signal reception and audio clarity. Filters are defined by width numbers, where, for instance, 3.2kc is broader than 1.8kc. Narrow filters can be particularly useful in scenarios with weaker signals or potential band interferences.
Use the Band Selector to easily pick your desired band. Once you've made your choice, the corresponding band button will light up in green, confirming your selection.
The Volume Panel offers you precise control over your audio settings. With the VOL feature, you can adjust your listening volume. The POWER feature lets you set your transmission strength. It's essential to set your MIC properly to ensure clear communication; always aim to be in the green "ALC" zone on the S-Meter for the best results. You also have the RF Gain, which is vital for reception quality, and the VOX settings that allow you to configure voice-triggered operations.
Use the Audio Control Selector to set up HamSphere according to your audio preferences. Both the Speaker and Mic Icons have dropdown menus, allowing you to choose your audio output and input devices, ensuring you get the best sound experience based on your equipment.
Curious about your connection? Just click the small 'I' at the bottom right of the plugin to see server and latency details. Activate the DX Mon button, which will turn green, to get insights on signal reception across bands 10-160m for any antenna. If the text size isn't quite right for you, adjust it using the S, M, and L buttons on the Monitor plugin.
With this versatile plugin, you can do more with ease. When you select the main button, it lights up in green, showing the rig in the primary view right in front of you. Want to access your logbook? Just press the cluster/logbook button, and it's right there.
With the Antenna Selector, you have an array of antenna choices at your fingertips. At the bottom of the selector, color-coded boxes give you a quick overview of the antennas available, the ones you've purchased, and the one you're currently using. This plugin is mainly for the 6M and HF bands. When you've loaded an antenna, you'll see the light on the plugin turn green, letting you know it's active.